Video Quick Start Guide
Getting Started:
Have your Zoho CRM account ready or create your free account at zoho.com
Buy and Download the Gravity Form to Zoho CRM plugin
Install and configure Gravity Forms
Install the Plugin:
From the WordPress Dashboard, click Plugins and select Add New
Choose Upload and upload the zip file you received when purchasing the plugin.
Once installed, go to the WordPress Dashboard, click Plugins and then Installed Plugins and find the installed Gravity Form to Zoho CRM plugin, click activate
Setup the Plugin:
From the WordPress dashboard, click Settings and selectGravity Forms to Zoho CRM plugin
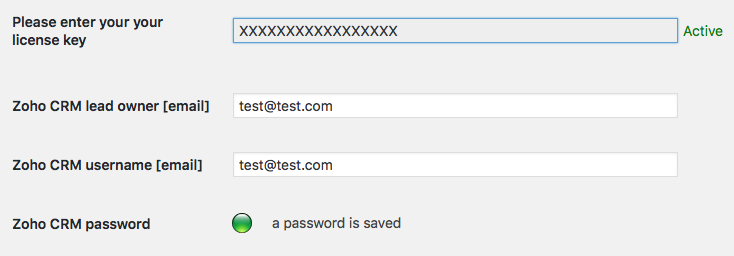
- Ensure you have your license key ready, it’s available here with your Purchase History
- Activate your plugin by entering the license key
- Zoho CRM lead owner [email]: Enter Zoho CRM Lead owner email address
- Zoho CRM username [email]: Enter Zoho CRM username email
- Zoho CRM password: Enter Zoho CRM password
Click Save Zoho Settings
Now you can test the connection between the plugin and Zoho CRM. Click ‘test connection‘ and then login to your CRM account, you should find a new test lead in your lead queue.
If you use two factor authentication on your Zoho CRM account please also review this help article.
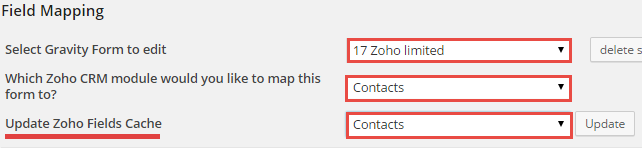
Map the Zoho Fields
After you save all of the plugin settings, this field should appear on the Settings screen:
Select which Gravity form you would like to edit and specify each field as you would prefer it to be mapped to your Zoho account.
Zoho Description fields
Zoho provides a general field “Description” that is commonly used as a free form text field. For example to send an enquiry field from your WordPress site. From version 2.6 of our plugin we now support mapping multiple fields in Gravity to the one Description field. They will now be combined into the one Description field when submitted.

Working with custom Zoho fields
In version 2.5 and higher the plugin will automatically detect all of the custom field that you have in your Zoho CRM account. It will show these custom fields in the drop down menu of fields available for mapping.
If you add a new field in your Zoho account you’ll need to use the Update button (see below) to force the plugin to retrieve the latest list of custom fields that are available.
Advanced Zoho Integrations
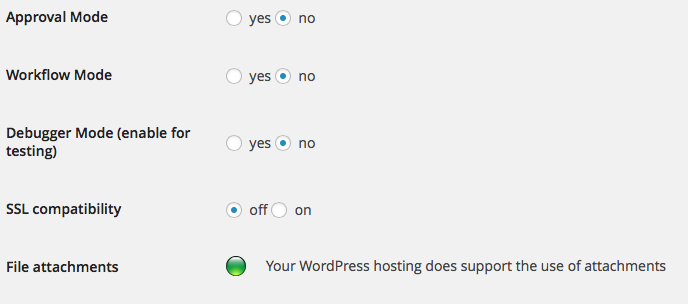
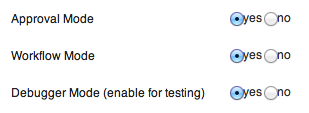 Some users of Zoho will also want to use Approval Mode and Workflow Mode when entering leads into the CRM from their web site. Our plugin supports both of these options.
Approval Mode
This mode is used to allow you to approve the leads before they are entered into the main leads section of Zoho. This is useful if you need to filter for SPAM or any other kind of filtering before the data becomes a live lead.
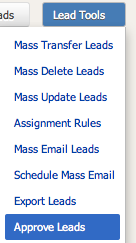 When turned on in the plugin, the Zoho API will insert the lead but they will not show up in the main leads section. Instead clicking Lead Tools from the right side of the lead interface and then Approve Leads will shows you these leads and allow you to approve them, then they will show with the rest of your leads.
Workflow Mode
If you have configured workflow options in Zoho (e.g. an email to be sent to the lead) enable this option in the plugin setup will request the Zoho API to execute these workflow options when a new lead is entered into the system.
If you are using Approval Mode, don’t also turn on Workflow Mode as workflows will be executed once a lead is approved in the Zoho interface. Unless you required the workflows to run both when the lead is entered for approval as well as when it is approved.
SSL Connection Compatibility
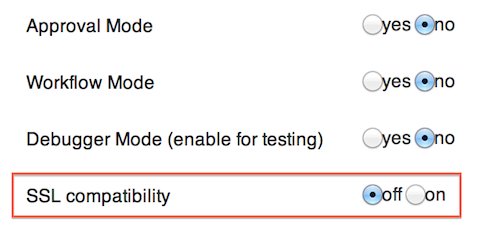 Our plugin connects to the Zoho CRM API via SSL. Some shared hosting environments don’t allow such connections or are not setup correctly with SSL certificates. If you’re having a problem with the connection between your WordPress site and Zoho CRM choose ‘On’ in the SSL compatibility option (pictured here).
We recommend leaving this setting switch to ‘Off’ unless you experience a connection problem.
Set the Lead Owner when inserting into Zoho CRM
It’s possible to configure each form to have a different lead owner when the lead is sent into Zoho CRM.
View this tutorial for a detailed walk through.
File attachments
Support for file attachments has been added in version 2.4 and above.
Now a gravity form that uses the file upload field type can allow a user to attach a file attachment that will in turn be sent along with the lead into Zoho CRM.
The screenshot below shows the attachment below the main lead information in Zoho CRM.

Important!
The file attachment functionality requires a hosting environment that supports the PHP Curl library. The plugin will detect if your hosting setup does support this and displays a message in the main settings panel. The screenshot below shows the situation where the hosting does support the curl library.
Mapping file fields
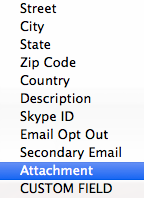
When you add a file upload field the plugin will allow you to assign this field as an attachment. Instead of choosing a Zoho field name to assign, choose Attachment from the drop down menu on your file upload field.
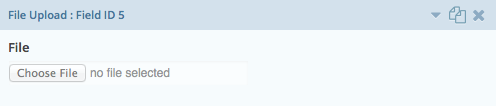
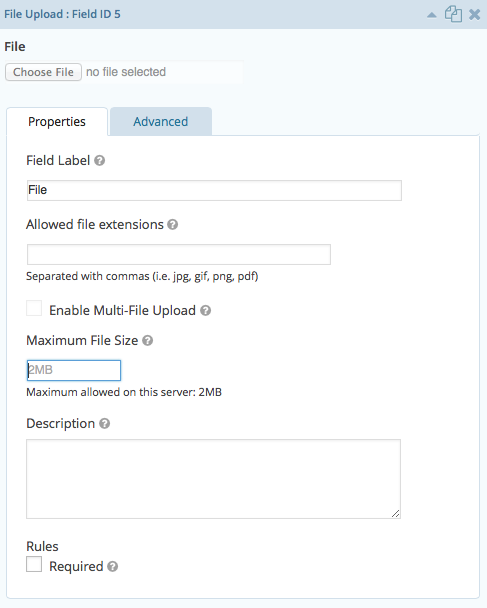
Zoho CRM file attachment limitations
Zoho CRM has a maximum file size of 20MB.
To ensure that you don’t exceed this maximum it’s recommended to use the option inside the file upload field to set the file size that you will allow.
The screenshot shows you where this option is inside the field properties.
This functionality requires you to have storage available in your Zoho CRM account. Below is the current storage allocations from the Zoho website. Contact Zoho directly to arrange more storage for your file attachments.
Data Storage Limits
- Default storage limits for the organization are:
- Free Edition – 256 MB for the Org.
- Professional Edition – 256 MB for each user license
- Enterprise Edition – 512 MB for each user license
Zoho CRM Contacts
From version 2.5 we now also support mapping of Gravity Forms to create a new contact in Zoho.
In the screen shot below there is a new question asking if you’d like to create a lead or a contact in Zoho with this form.