Posted by Peter
08 September 2015I’m a big advocate of tracking and statistics. A marketing nerd who always wants to know the answer to questions like: where is my best traffic coming from? And. How do I get more of it?
If you’ve attended any of our WordPress training webinars you’ve probably heard me express this more than once:
If you’re going to do it, track it.
In the offline world of marketing it’s not alway possible to get granular data on how people interact with your various efforts. Digital Marketing is another story. In the WordPress ecosystem, where you and I specialise, there’s an abundance of tools and methods to track and report on your website activity.
In today’s post I want to introduce you to Campaign Tracking using Google’s URL builder and a brand new WordPress plugin that we have released to help people track this data.
Campaign Tracking 101
We use Google Analytics for our WordPress sites, when we release a site for a client we also install and configure Google Analytics to track and store website analytic data. Chances are you’re using Google Analytics too. It’s by far the most popular website statistics tool around.
The basic idea of this is track, in detail, where your visitors are coming from. You can then get into the analysis of the behaviour of visitors – from particular sources. For example you might find that visitors that come from your Facebook ads result in more leads per 100 users than traffic that comes in via another source. Based on this information you can begin to make decisions on where you spend your budget and resources – obviously targeting the sources where you get the best results.
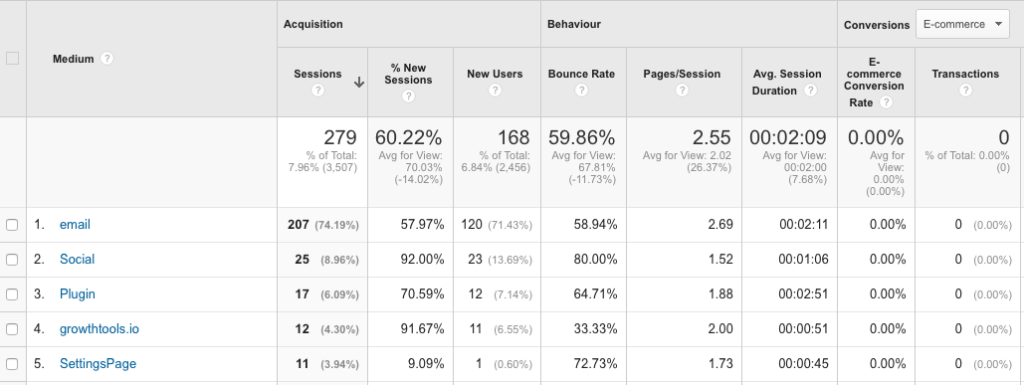
Google Analytics showing campaign tracking data
I’m not going to get too fancy here though. Let’s start with the basics. How to setup Campaign Tracking for Google Analytics. Keep reading though because I am going to show you how to add this data as it come through your website forms. This is really cool. Each time you get an enquiry you can see the tracking data for that visitor.
Rock solid marketing data for every lead!
Google Tracking URLs
You might have seen these already, perhaps without knowing what they are. If you use services like MailChimp chances are you’re already using them. Mailchimp will add these kinds of tracking variables to your eMails when they are sent.
http://SampleDomain.bla/?utm_source=twitter.com&utm_medium=social&utm_campaign=Sample
There are a number of values that are stored in the URL. These values are setup by you and then in turn passed through to your Google Analytics account. In this example, the source is set to being Twitter.com – so it’s a link that I would share on Twitter. The medium is setup to social – a good value to use for all of your social media. Finally the campaign name is simple Sample.
To learn more about the values and how they should be used refer to this amazing guide – The Definitive Guide To Campaign Tagging in Google Analytics.
Traffic that is coming to your site from difference sources can then have a unique set of values so the you can determine where the visitors came from. When you place an add on Facebook you setup the URL that you give to be specific for that scenario. If you share links on Twitter again you have a different set of values there too.
Here is the same URL, if I were going to share it on Facebook instead:
http://SampleDomain.bla/?utm_source=facebook.com&utm_medium=social&utm_campaign=Sample
How to create campaign tracking URLs
Google has a tool that is available here, the Google URL builder. It allows you to fill in the various values that you’d like to use and then it will generate a tracking URL. If you like the idea of doing this inside WordPress, I’ll show you how you can also do that.
How to store all of your URLs values
It’s a good idea to set yourself up with a means of recording all of these URLs. Firstly so when you’re looking at your analytics account over time you can remember the URL values that you have used and of course as a reference when you’re wanting to create new URLs in the future. You’ll be wanting to always use the same reference for Twitter or your Google PPC ads etc..
An easy way to record this information is to store it with a spreadsheet. However read on because we also have a great solution for doing this from within your WordPress site too.
Campaign Data added to your enquiries
So far you have a different tracking URL setup for a variety of marketing activities that you’re undertaking. How cool would it be then to be able to access that data and add it to the enquiries that are coming through your website?
Well that’s where our newest plugin comes in – Campaign Tracker for WordPress. It will read the marketing data and when a visitor fills in a form on you website it will add their specific data to that form in a group of hidden fields. The resulting being that you see the fields from your enquiry form (the usual things like name or email etc.. ), along side these you will also see that this specific user came from your Facebook ad. Or your SEO listing on Google. Or from a link you shared on Twitter.
Nice huh?
If you send your form enquiries into a CRM you can also send this tracking data into the CRM. Your sales people can know exactly where the lead came from. Your marketing activities can be tuned based on what you see. You can know that leads that come from social media often end up buying but leads that come from another source do not.
The plugin has some more information, including a quick video walk through that you can check out here.
There you have an introduction to campaign tracking specifically for WordPresss users. You will find some other blog posts that also cover the topic and our plugin that might be good extra reading.
Go start tracking now!
Lottie Player for WordPress is here!
Lottie Player adds support for Lottie files in your WordPress website. Upload and manage Lottie files directly within your WordPress dashboard, then embed the lightweight Lottie animation on the front end of your website using a block or via a shortcode.